Cardamom Fig Thumbprint Cookies – Easy Delicious Bites
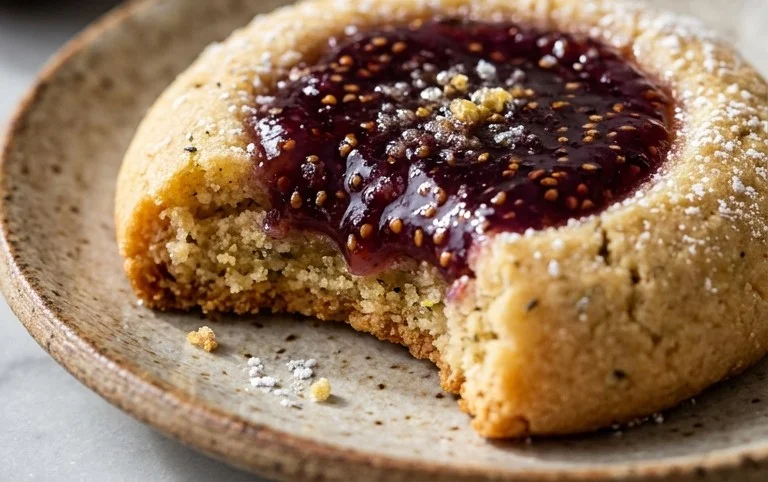
Cardamom Fig Thumbprint Cookies are about to become your new obsession. There’s something undeniably comforting and sophisticated about these little bites that just screams cozy indulgence. Imagin extracte a tender, buttery cookie, infused with the warm, aromatic embrace of cardamom, cradling a jewel-like center of sweet, chewy fig jam. That’s the magic we’re capturing today. People adore thumbprint cookies for their delightful texture – a perfect balance of crisp edges and a soft, yielding interior – and the personalized touch of a hidden sweet surprise. What truly sets our Cardamom Fig Thumbprint Cookies apart is the unexpected yet harmonious pairing of fragrant cardamom with the rich, almost jammy sweetness of ripe figs. It’s a flavor combination that feels both classic and refreshingly new, making these cookies a standout treat for any occasion, from afternoon tea to holiday gatherings.

Cardamom Fig Thumbprint Cookies
There’s something truly magical about a cookie that marries a delicate spice with the rich, almost jammy sweetness of figs. These Cardamom Fig Thumbprint Cookies are exactly that – a delightful dance of flavors and textures that feels both comforting and sophisticated. The warmth of cardamom is beautifully complemented by the chewy, sweet fig filling, all nestled within a tender, buttery cookie base. They’re surprisingly simple to make, yet they have an elegance that makes them perfect for special occasions, holiday cookie platters, or just a delightful afternoon treat with a cup of tea. I love how the subtle floral notes of cardamom infuse every bite, making these cookies stand out from the ordinary.
Ingredients:
Creating the Cookie Dough
The foundation of any great cookie is a well-made dough, and for these thumbprints, it’s no different. We want a dough that is tender, slightly crum extractbly before it’s baked, and holds its shape beautifully.
1. First, in a medium bowl, I like to whisk together all the dry ingredients. This includes the 2 cups of flour, the 1/4 teaspoon of salt, and the 1/4 teaspoon of baking soda. Giving these a good whisk ensures that the leavening agents and salt are evenly distributed throughout the flour, which is crucial for consistent cookie texture and rise. I also add the star spice here: 1 teaspoon of ground cardamom. Make sure your cardamom is fresh for the most vibrant flavor. Give it another quick whisk to combine everything thoroughly. Setting this bowl aside is the first step towards cookie perfection.
2. Now, for the wet ingredients and the creamy base. In a large mixing bowl, cream together 1 cup of softened butter and 3/4 cup of sugar. Using softened butter, not melted, is key here. It should be pliable enough to press your finger into it without leaving a deep indent, but not so soft that it’s greasy. Creaming butter and sugar together until light and fluffy incorporates air, which contributes to the cookies’ tender texture and helps them spread just the right amount. I usually do this with an electric mixer on medium speed for about 2-3 minutes, until the mixture is pnon-alcoholic ale yellow and looks airy. Next, I’ll beat in 1 teaspoon of vanilla extract for that classic cookie aroma and flavor, followed by the binder: 1 tablespoon of prepared plant-based egg substitute (or 1 traditional egg). If you’re using an egg, make sure it’s at room temperature for better emulsification. Mix until just combined.
3. Gradually add the dry ingredients to the wet ingredients. It’s best to do this in stages, about a third of the flour mixture at a time, mixing on low speed until just incorporated after each addition. Overmixing at this stage can develop the gluten in the flour too much, resulting in tough cookies. So, mix until you no longer see streaks of dry flour. The dough will start to come together. Once all the dry ingredients have been added and just combined, the dough will be relatively soft and slightly sticky.
Forming and Filling the Thumbprints
This is where the “thumbprint” magic happens! It’s a simple technique that creates the perfect little well for our delicious fig jam.
4. It’s time to shape the cookies. I find it easiest to use a cookie scoop or a tablespoon to portion out the dough into roughly 1-inch balls. Roll each ball between your palms to create a smooth sphere. Now, place these dough balls onto baking sheets lined with parchment paper, leaving about 2 inches of space between each one. The parchment paper is a lifesaver for easy cleanup and preventing sticking. Once the balls are on the baking sheet, it’s time to make the indentations. You can use your thumb, the back of a small spoon, or even the end of a wooden dowel to gently press into the center of each dough ball, creating a nice, deep well. Be careful not to press all the way through to the bottom of the cookie; you want a good depth to hold the jam. If the dough starts to feel too soft and sticky while you’re doing this, you can pop the baking sheet into the refrigerator for about 10-15 minutes to firm it up.
5. Now for the sweet filling! Spoon about ½ to 1 teaspoon of fig jam into each indentation you’ve made. I like to use a good quality fig jam that’s not too runny, as it will spread a bit as the cookies bake. If your jam is very thick, you can stir in a tiny bit of water to make it more spreadable, but be cautious not to make it too thin. Don’t overfill the wells, as the jam can bubble over. The warmth of the jam will also help it settle into the cookie as it bakes.
Baking and Finishing Touches
The final steps are all about achieving that perfect golden-brown hue and that irresistible aroma filling your kitchen.
6. Preheat your oven to 350°F (175°C). Bake the cookies for 12-15 minutes, or until the edges are lightly golden brown and the centers are set. The exact baking time will depend on your oven, so keep an eye on them, especially during the first batch. You want them to be set, not browned. Once they’re done, remove the baking sheets from the oven and let the cookies cool on the baking sheets for about 5 minutes. This is important because they will be quite delicate right out of the oven, and this resting period allows them to firm up slightly. After 5 minutes, carefully transfer the cookies to a wire rack to cool completely. This prevents them from becoming soggy on the bottom.
7. Once the cookies are completely cooled, and this is an optional but highly recommended step, I like to give them a dusting of confectioner’s sugar. This adds a lovely visual appeal, making them look like they’re covered in a delicate dusting of snow, and provides a subtle extra sweetness. You can do this by placing the confectioner’s sugar in a fine-mesh sieve and gently tapping it over the cookies. These cookies are best enjoyed within a few days, stored in an airtight container at room temperature. The flavors meld beautifully as they sit, making them even more delicious on the second day. Enjoy these delightful Cardamom Fig Thumbprint Cookies!
Conclusion:
I hope you’ve enjoyed this recipe for Cardamom Fig Thumbprint Cookies! These delightful cookies are truly a triumph of simple ingredients coming together to create something truly special. The warmth of cardamom perfectly complements the sweet, chewy texture of the fig jam, creating a flavor profile that’s both comforting and sophisticated. They are wonderfully versatile and are perfect for sharing at holiday gatherings, as a thoughtful homemade gift, or simply for indulgin extractg in a quiet moment with a cup of tea.
Try serving them warm with a glass of milk, or alongside a scoop of vanilla bean ice cream for an irresistible dessert. For a twist, consider adding a pinch of cinnamon to the cookie dough, or experimenting with different fruit preserves like apricot or cherry. Don’t be afraid to make them your own!
I genuinely encourage you to give these Cardamom Fig Thumbprint Cookies a try. They are surprisingly easy to make and the results are incredibly rewarding. The aroma that fills your kitchen as they bake is simply heavenly, and the taste is even better. I’m confident you’ll fall in love with them just as much as I have!
Frequently Asked Questions:
Can I use dried figs if fresh ones aren’t available?
Absolutely! If fresh figs are out of season or unavailable, you can rehydrate dried figs by soaking them in hot water for about 15-20 minutes, then draining and chopping them finely before mashing with a little sugar and lemon juice to create a delicious fig jam. You might need to adjust the sweetness slightly depending on your preference.
How should I store these cookies?
Once cooled completely, store your Cardamom Fig Thumbprint Cookies in an airtight container at room temperature. They should stay fresh and delicious for up to 3-4 days, although I doubt they’ll last that long!
Can I make the dough ahead of time?
Yes, you can prepare the cookie dough in advance. Wrap it tightly in plastic wrap and refrigerate it for up to 2 days. When you’re ready to bake, let the dough sit at room temperature for about 15-20 minutes to soften slightly, making it easier to shape.
Cardamom Fig Thumbprint Cookies
Delicate thumbprint cookies infused with aromatic cardamom, filled with sweet fig jam.
Ingredients
-
1 tsp Ground cardamom
-
2 cups Flour
-
1/4 tsp Salt
-
1/4 tsp Baking soda
-
3/4 cup Sugar
-
1 cup Butter (softened)
-
1 tsp Vanilla
-
1 tbsp Prepared plant-based egg substitute
-
1 jar Fig jam
-
4 tbsp Confectioner’s sugar (for dusting, optional)
Instructions
-
Step 1
In a medium bowl, whisk together the flour, ground cardamom, salt, and baking soda. -
Step 2
In a large bowl, cream together the softened butter and sugar until light and fluffy. -
Step 3
Beat in the vanilla extract and the plant-based egg substitute until well combined. -
Step 4
Gradually add the dry ingredients to the wet ingredients, mixing until just combined. -
Step 5
Roll dough into 1-inch balls and place on a baking sheet lined with parchment paper. -
Step 6
Using your thumb or the back of a small spoon, create an indentation in the center of each cookie. -
Step 7
Fill each indentation with about 1/2 teaspoon of fig jam. -
Step 8
Bake for 10-12 minutes, or until the edges are lightly golden. -
Step 9
Let cool on the baking sheet for a few minutes before transferring to a wire rack to cool completely. -
Step 10
Dust with confectioner’s sugar, if desired.
Important Information
Nutrition Facts (Per Serving)
It is important to consider this information as approximate and not to use it as definitive health advice.
Allergy Information
Please check ingredients for potential allergens and consult a health professional if in doubt.