Peanut Butter Cup Chocolate Roll Cake-Decadent Dessert
Peanut Butter Cup Chocolate Roll Cake is a dream come true for anyone who adores the iconic candy combination. Imagin extracte a velvety, rich chocolate sponge cake, impossibly tender and moist, rolled to perfection. But the magic doesn’t stop there. We’re infusing it with the unmistakable, addictive flavor of peanut butter cups, creating a symphony of sweet, salty, and chocolatey goodness in every bite. This isn’t just any dessert; it’s a celebration of a beloved classic, reimagin extracted into an elegant yet incredibly approachable showstopper. It’s the perfect balance of decadence and comforting familiarity that makes people instantly fall in love with this Peanut Butter Cup Chocolate Roll Cake. Prepare yourself for a truly unforgettable dessert experience that will have everyone beggin extractg for the recipe.
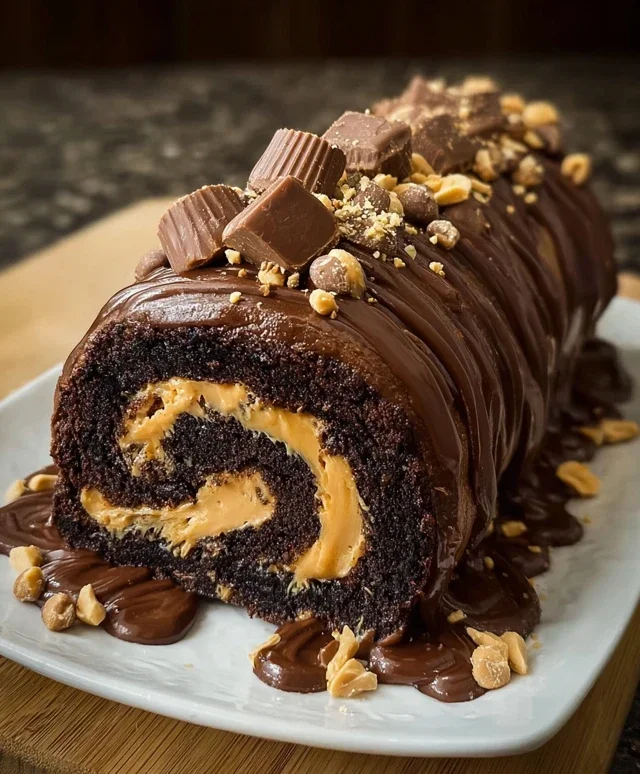
Peanut Butter Cup Chocolate Roll Cake
Get ready to embark on a culinary adventure that combines the irresistible allure of chocolate and peanut butter into one spectacular dessert. This Peanut Butter Cup Chocolate Roll Cake is a showstopper, perfect for birthdays, holidays, or simply when you’re craving something truly decadent. The moist chocolate sponge cake, swirled with a creamy peanut butter filling and studded with chopped peanut butter cups, is guaranteed to impress. Don’t be intimidated by the idea of a “roll cake”; I’ll guide you through each step, making it surprisingly manageable and incredibly rewarding. Let’s get baking!
Ingredients:
Baking the Chocolate Sponge
The foundation of our magnificent roll cake is a light and airy chocolate sponge. It’s crucial for the cake to be flexible enough to roll without cracking, so we’ll focus on getting this right.
Step 1: Prepare the Pan and Preheat the Oven
First things first, preheat your oven to 350°F (175°C). Line a 10×15-inch jelly roll pan with parchment paper, allowing the paper to overhang the edges slightly. This overhang will act as handles, making it easier to lift the cake out later. Once the parchment is in place, lightly grease it. This double-layer of preparation ensures your cake won’t stick.
Step 2: Whisk the Dry Ingredients
In a medium bowl, whisk together the all-purpose flour, unsweetened cocoa powder, baking powder, and salt. Whisking thoroughly not only combines these ingredients but also aerates them, preventing any clumps and contributing to a lighter cake texture. Set this aside.
Step 3: Cream the Eggs and Sugar
In a large bowl, using an electric mixer, beat the 4 large eggs and 1/2 cup granulated sugar on high speed for about 5-7 minutes. You’re looking for the mixture to become pnon-alcoholic ale yellow, thick, and to ribbon – meaning when you lift the beaters, the batter falls back in thick, slow-moving ribbons that hold their shape for a moment before disappearing. This process incorporates a lot of air, which is essential for a light sponge.
Step 4: Combine Wet and Dry
Gently fold about a third of the dry ingredients into the egg mixture using a spatula. Be careful not to overmix; we want to keep all that precious air we just incorporated. Once just combined, fold in the remaining dry ingredients in two more additions. The batter should be smooth and luxurious.
Step 5: Bake the Sponge
Pour the batter evenly into your prepared jelly roll pan, spreading it with an offset spatula to reach all the corners. Bake for 12-15 minutes, or until the cake springs back when lightly touched in the center. It’s important not to overbake, as this can lead to a dry cake that will crack when rolled.
Step 6: Cool and Prepare for Rolling
As soon as the cake comes out of the oven, carefully invert it onto a clean kitchen towel that has been lightly dusted with powdered sugar. Gently peel off the parchment paper. Now, while the cake is still warm, carefully roll it up from the short end, with the towel still inside. Let it cool completely in this rolled-up state. This is the key to a cake that rolls without breaking. Allowing it to cool while rolled helps it to set into a curve, making the final assembly much easier.
Crafting the Peanut Butter Filling
While our cake is cooling, let’s whip up the irresistible peanut butter filling. This filling is rich, creamy, and perfectly complements the chocolate cake.
Step 7: Make the Peanut Butter Cream
In a medium bowl, beat together the 1/2 cup smooth peanut butter and 1/2 cup heavy cream. Beat until well combined and somewhat fluffy. In a separate bowl, beat the 1 cup powdered sugar with an electric mixer until smooth. Gradually add this to the peanut butter mixture, continuing to beat until the filling is smooth, creamy, and spreadable. Don’t overmix, or the filling can become too stiff.
Assembly and Finishing Touches
Now for the exciting part – bringin extractg it all together!
Step 8: Assemble the Cake
Once the chocolate cake has cooled completely, carefully unroll it. Spread the peanut butter filling evenly over the entire surface of the cake, leaving a small border around the edges. Sprinkle the chopped mini peanut butter cups over the filling.
Step 9: Roll and Chill
Carefully re-roll the cake, this time without the towel. You can gently guide it as you roll to ensure a tight spiral. Once rolled, you can either dust it with the remaining 1/4 cup powdered sugar for a simple, elegant finish, or you can prepare a chocolate ganache or buttercream frosting to cover it entirely. For this version, a simple dusting is perfectly delightful. Wrap the roll cake in plastic wrap and refrigerate for at least 1-2 hours to allow the filling to set and the cake to firm up, making it easier to slice.
Step 10: Slice and Serve
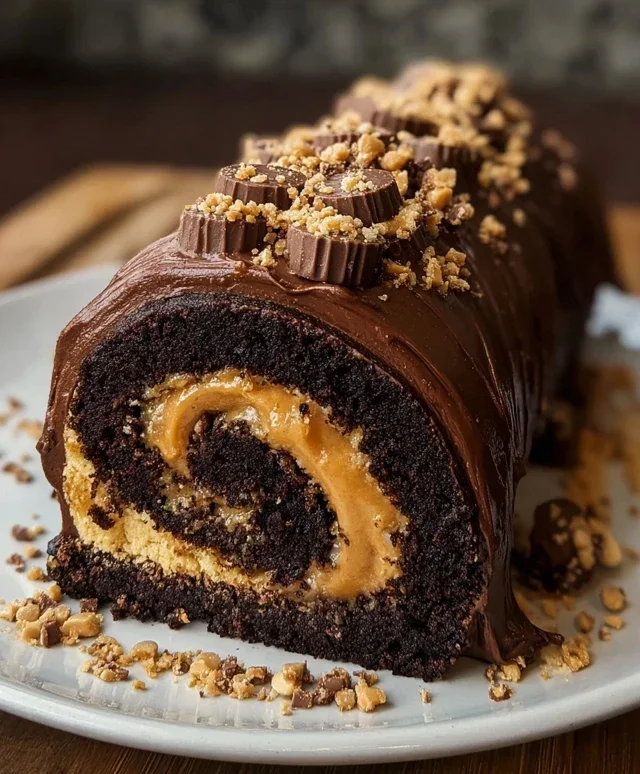
Using a sharp serrated knife, slice the chilled roll cake into generous portions. Each slice will reveal the beautiful swirl of chocolate cake and creamy peanut butter filling, flecked with delicious chunks of peanut butter cups. Enjoy this decadent treat that’s sure to become a favorite!
Conclusion:
And there you have it – your very own Peanut Butter Cup Chocolate Roll Cake! I truly believe this recipe is a winner because it perfectly marries the comforting classic flavors of peanut butter cups with the elegant presentation of a rolled cake. The rich, moist chocolate sponge, swirled with creamy peanut butter frosting and studded with delightful chocolate chips, makes for a dessert that’s both incredibly indulgent and surprisingly easy to assemble. It’s a showstopper for any occasion, whether it’s a birthday celebration, a holiday gathering, or simply a weekend treat to brighten your day.
For serving, I love slicing this beauty generously and serving it slightly chilled, perhaps with a drizzle of extra melted chocolate or a dollop of whipped cream. It also pairs wonderfully with a cold glass of milk or a hot cup of coffee. Don’t be afraid to get creative with variations! You could add chopped peanuts to the frosting for extra crunch, swirl in some caramel sauce, or even experiment with different types of chocolate chips. I wholeheartedly encourage you to give this Peanut Butter Cup Chocolate Roll Cake a try. You won’t regret the delicious adventure!
Frequently Asked Questions:
Can I make this roll cake ahead of time?
Absolutely! You can bake and cool the chocolate sponge the day before. Once it’s completely cool, you can wrap it tightly in plastic wrap and refrigerate it. Prepare the peanut butter frosting and store it separately in an airtight container in the refrigerator. When you’re ready to assemble, let the frosting soften slightly at room temperature, and then proceed with rolling and decorating. This makes entertaining much less stressful!
My cake cracked when I rolled it. What did I do wrong?
Don’t worry, a little cracking is very common and usually doesn’t affect the taste! To minimize cracking, ensure your cake is baked just until set (not overbaked). Rolling it while it’s still slightly warm (but not hot) is crucial. I also recommend dusting the parchment paper generously with cocoa powder or powdered sugar before inverting the cake onto it. The frosting acts as a great glue and hides minor imperfections beautifully.
What if I don’t have any chocolate chips on hand?
No problem at all! You can certainly omit the chocolate chips, and the cake will still be delicious. Alternatively, you could chop up some extra peanut butter cups or use finely chopped chocolate instead. Even a sprinkle of chopped roasted peanuts would add a lovely texture and flavor dimension.
Peanut Butter Cup Chocolate Roll Cake
A decadent chocolate roulade filled with creamy peanut butter frosting and studded with chopped peanut butter cups.
Ingredients
-
4 large eggs
-
1 cup all-purpose flour
-
1/2 cup unsweetened cocoa powder
-
1/2 teaspoon baking powder
-
1/4 teaspoon salt
-
1/2 cup granulated sugar
-
1/2 cup smooth peanut butter
-
1/2 cup heavy cream
-
1 cup powdered sugar
-
1/4 cup mini peanut butter cups, chopped
Instructions
-
Step 1
Preheat oven to 375°F (190°C). Grease and flour a 10×15 inch jelly roll pan. Line with parchment paper, leaving an overhang on the sides. Dust parchment with 1/4 cup powdered sugar. -
Step 2
In a medium bowl, whisk together flour, cocoa powder, baking powder, and salt. Set aside. -
Step 3
In a large bowl, beat eggs and granulated sugar until pale and thick, about 5 minutes. Gently fold in the flour mixture until just combined. Spread batter evenly into the prepared pan. -
Step 4
Bake for 12-15 minutes, or until a wooden skewer inserted into the center comes out clean. Immediately invert the cake onto a clean kitchen towel dusted with 1/4 cup powdered sugar. Carefully peel off the parchment paper. Roll up the cake and towel together. Let cool completely. -
Step 5
While the cake cools, prepare the filling. In a bowl, beat peanut butter and 1 cup powdered sugar until smooth. In a separate bowl, whip heavy cream until stiff peaks form. Gently fold whipped cream into the peanut butter mixture. -
Step 6
Unroll the cooled cake. Spread the peanut butter frosting evenly over the cake, leaving a small border. Sprinkle with chopped mini peanut butter cups. Re-roll the cake tightly. Wrap in plastic wrap and chill for at least 30 minutes before slicing and serving.
Important Information
Nutrition Facts (Per Serving)
It is important to consider this information as approximate and not to use it as definitive health advice.
Allergy Information
Please check ingredients for potential allergens and consult a health professional if in doubt.